I got into guitar last year, and this summer bought myself a beautiful Les Paul electric guitar. Of course, my pedal collection began growing as well, and my hacked up 12v psu connected to a 7809 regulator isn’t going to be enough. The power supplies are simple, just 9v out on a barrel jack. Surely they can’t be too expensive!

Okay… I am not spending over $100 on a power supply…
Let’s make our own!
I don’t really know what is inside of these, but they can’t be much! After all, most of them don’t even handle AC power! They take in some larger amount, like 18-24v, then step it down to the 9v needed. There is no reason for such a simple thing to be so expensive.
Sticking to my original way of powering my pedals, I will make a simple PCB with some 7809 9v regulators and some decoupling capacitors to filter out any noise that may be made.
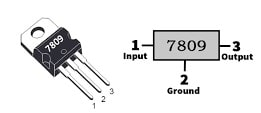
A LM7809 is a simple Linear Regulator, where it steps down a wide voltage range from 11-35v down to 9v. They’re extremely simple, check this diagram:

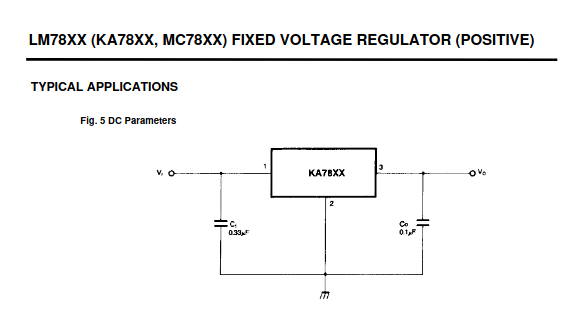
That’s really it, input voltage and output. The datasheet recomments adding some capacitors as such:

That’s simple enough, let’s make it power some pedals!
I wan’t to make a PCB for this and a nice 3D printed case, as if it were an actual product! Plus, if we could beat $100, that would be beautiful. Based on what we just looked at, my idea is simple. Two 7809 regulators connected to 6 different DC barrel jacks, and a little LED to let us know it’s alive. Of course, one more DC jack for an input, which we’ll use a 12v input. Not only are they easy to find, they’re also cheap.
Since the 7809s are linear regulators, they dissipate a good bit of heat. However, I am not too worried about this. I’ve used these regulators a couple other times in free air, and under 500 mA, they are fine without a heatsink. I don’t plan to run them at maximum power delivery either, as my most exhaustive pedal only uses 100 mA, but I will add cooling in a future revision.
It may also be a little late to say that I have never designed a PCB, I have no clue what I am doing. However, working with kits from QRP Labs has given me some good insight, so it shouldn’t be too hard.
Here’s what I made:

Note: There’s a few mistakes in this schematic, can you find them? I surely didn’t! (foreshadowing)
The two 7809’s go to their respective barrel jacks, with 4 “low” power ones and 2 “high” power ones. In reality, these are both the same thing just with a different number of ports, but the idea is that if you have a high power pedal, such as one that uses 500 mA, you wouldn’t want to overuse the 7809 that only has 200 mA left to spare.
There’s also a LED attatched to the second 7809, just to tell when it is plugged in.
Next up is putting it on a PCB, here’s what I came up with:

I didn’t know the name “PedalPower” was an actual product until after I purchased these, oopsie. Silly little mistake
I let the two 7809s lay flat, that way if heating becomes an issue there’s space to add a heatsink later. I kept it small, as I want it to be portable and cheap. PCBs quickly get expensive as they become larger, especially for prototypes.
Of course, this website is included on the silkscreen, and I added the exozyme logo, because I love them over there :)
Again, this is my first time designing a PCB, though I think I did pretty okay. I didn’t want to deal with any SMD components either, so it is all through-hole.
The four mounting holes are also properly sized for M2 size screws
Fabrication
Now, it’s time to buy the PCB and parts! KiCad has a built in Bill of Materials feature, so we’ll use that. I opened up the BOM editor and searched DigiKey for each respective component, then added DigiKey’s part ID to the BOM.
After that, I got this:
Reference    Value          Digikey Part Number   Qty
R1	         820            ~                     1
D1	         LED            732-5008-ND	          1
C3,C4        0.1µf          ~                     2
C1,C2        0.33µf         ~                     2
U1,U2        LM7809_TO220   2156-LM7809CT-ND      2
J10          INPUT 18v      CP-002A-ND	          1
J5,J6        500MA OUT      CP-002A-ND	          2
J1,J2,J3,J4	 200MA OUT      CP-002A-ND	          4
Note: I reformated the BOM to look neater on the website
I left out the capacitors and resistors because I already have plenty already. I threw this right into DigiKey, who collected each part with the proper quantities! They even helps automatically adjust price with better matches, so if I could get say, 10 7809s for just as expensive as 6 (due to bulk pricing), It noticed and asked me!
I ordered enough for three power supplies in total, which came out to be $24.02. Not bad! I did have to change out the 7809’s for a cheaper alternative, the MC7809s. They are the exact same thing, just made by a different manufacturer. The LM7809s were marked as obsolete on DigiKey.
Now time to order the PCB! I decided to use OSHPark, as they are 100% US fabricated and based. I would rather use them for the comfort of knowing proper regulations and labor laws are being met, it is worth the extra price to me. They also have a beautiful privacy policy!
I dropped in my project files and boom, OSH Park handled the rest.

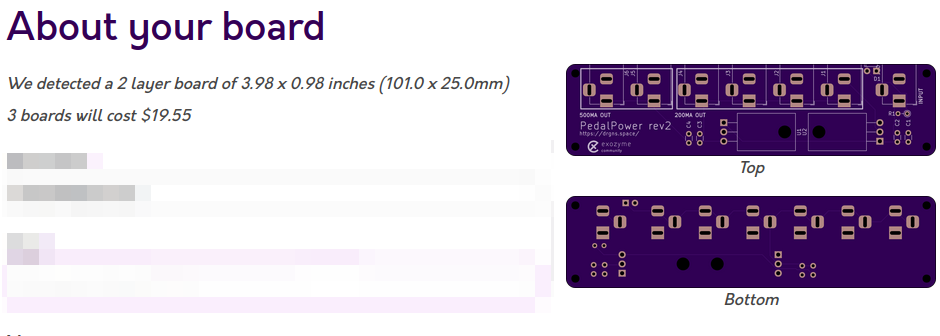
The minimum order is 3 boards, and I don’t have too much use for more than one. As listed, the cost of PCBs, after shipping, was $19.55. That’s not bad, nearly $43 for 3 of them! If we compare that to the generous $100 I would’ve spent for one from a store, I consider that a win. That means around $14.3 per device.
Future
That is really all for now, as I need to wait for the components and PCBs to come in. We’re also going to make a 3D printed enclosure later. Come again soon for the next post!
I also plan to remake this project, including a AC to DC rectifier to remove the DC power adapter needed.